Creating, Modifying, and Deleting Resources
When working in the Collaborate app, you can create resources such as cameras, vehicles, rooms, and more. After you create the resource, you can assign it to a topic or an assignment so that team members know that the resource is available to them.
To create a new resource:
1. Click the Add button in the Collaborate Header and select Add...Resource.
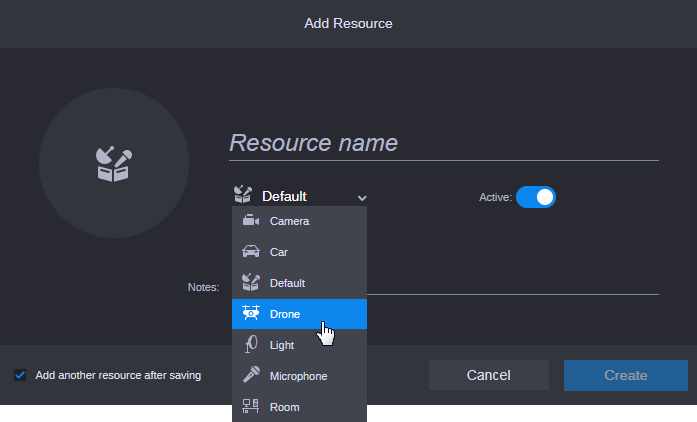
The Add Resource window appears.
2. Enter the name of the resource in the Resource Name field.
If you have multiple resources of the same type, you might want to include an associated resource number so that you can better track the resource allocation. If for example you have three satellite trucks, you might want to enter the names as Van 01, Van 02, and Van 03 — or whatever your identification system might be.
3. (optional) Select an option from the Resource Type menu that matches your resource.
When you select a new resource type, the icon in the resource’s avatar is updated.
The Collaborate app does not allow you to create custom resource types at this time. If you have a resource that does not match any of the existing types, you can select the Default option to signify a non-specific resource type.
4. Verify the Active Resource toggle.


If enabled (default), the resource can be assigned to topics and assignments.


If disabled, the resource is considered
inactive and the resource’s avatar appears grayed-out in the user interface. This option can be useful to identify a piece of equipment that is out for repair or is otherwise temporarily unavailable. Simply disabling the resource avoids the task of deleting and recreating the resource if and when it becomes available again.
5. (optional) Type additional descriptive information to the Notes field.
You might want to use this field to indicate when an inactive resource will become available, when a particular resource has special features, or for any other note that might help a user decide when to add this specific resource to a topic, assignment, or task.
6. If you want to create another resource after saving the current one, enable the “Add another resource after saving” option at the bottom of the window. Otherwise, deselect this check box to disable this feature.
7. Do one of the following:

Click the Create button to save the new resource.

Click the Cancel button to close the Add Resource window without saving.
To modify an existing resource:
1. Select Resources from the Panel Access Menu, and then double-click the thumbnail for the resource that you want to modify.
The Resource Information window appears.
2. Alter the properties for the resource and click Save to accept the changes.
To delete a resource:
1. Select Resources from the Panel Access Menu, and then double-click the thumbnail for the resource that you want to delete.
The Resource Information window appears.
2. Click the Delete Resource button in the bottom-left corner of the Resource Information window.
The resource is deleted from the Collaborate app.


