Editing Master Data Properties
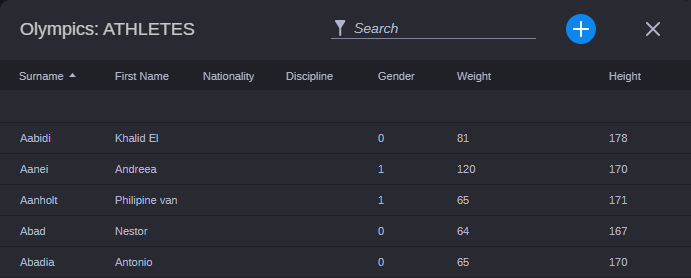
Master data records consist of multiple distinct values but are represented by only one value in annotation. In the Metadata tab, you are provided with an edit window with which you can select the master data record to be saved as value of the master data property. The value representing the master data record — this is the property used as first column in the master data edit window — is then shown in the master data field. The master data edit window additionally provides features for creating, editing and deleting master data records.
Note the following:
• Asset Management does not provide default master data records. Creating and using master data requires customization.
• Your ability to create, edit, or delete master data records depends on corresponding permissions in Asset Management. If you do not have the required permissions, the master data edit window will not show the add, edit and delete controls.
• You cannot delete a master data record that is used in a master data property of at least one asset.
• When creating or editing a master data record in the edit window changes are saved as soon as you click outside the edited row; this can be another row in the edit window, a column header, an empty space inside or outside the edit window, the Add button, Search field or the edit window’s close button.
If saving fails, a “Failed to save data” message box opens. Clicking the Retry button lets you sending the save request one more time.
• You can use the Arrow Up and Arrow Down keys to navigate through the rows in the edit window.
• When you change the value representing the master data record in the edit window, the value is updated in all master data fields in all assets where it has been inserted.
To insert a value in a master data field:
1. Click in the master data field.
The master data pick tool opens. The header shows the name of the asset and the master data class name.
If the property contains a lot of values, a “Loading” message might be shown before the values are displayed. During data loading, all edit options are disabled. If loading fails, a “Failed to load data” dialog box opens that lets you cancel the loading operation or retry loading one more time.
2. (optional) Start typing in the search box to filter the master data records to display only records that contain your input. While you type, a “contains” search is applied to the values. Depending on the property type, you might also type the corresponding divider (such as a period for a float value).

Text attributes with unlimited length that are assigned to a master data class are not searched within the master data pick tool.
If no values match your filter criteria, a corresponding message is shown.
Do one of the following:
- Click the “Show all values” link to clear the filter and show all values again.
- Modify your filter.
3. Double-click the desired master data record.
The master data pick tool is closed and the selected record is saved as value of the master data property. The value representing the master data record — this is the property used as first column in the master data pick tool — is shown in the master data field.
4. To replace a master data value, click on the master data field and double-click a new record from the master data window.
The master data pick tool is closed and the selected master data record is shown as new value of the master data property.
5. To remove a selected value from the master data property, click the X button that is shown at the right side when you hover thew mouse-pointer over of the field.
6. (only required if auto-save is disabled) Click the Save button to save your changes.
To create a master data record:
1. Click in the master data field to open the master data edit window.
The edit window header shows the name of the asset and the master data class name.
If the property does not contain a value yet, the following message is shown.
2. Click the plus button.
A row is added at the top of the table and highlighted. If you selected another row before, the new row is added above the previously selected row; the rows might scroll up or down to bring the new row into the visible range.
All fields of the new row are enabled for editing, and corresponding format placeholders might be shown (for example, for date-time attributes). The cursor is positioned in the first non-boolean property.
While in edit mode, the control for deleting the row is disabled.
3. Edit every field of the row as you would for a single-value property.
You can press the Tab key continue to the next field within the row. Note that Boolean fields are skipped.
- For each text attribute, the displayed text length is limited to one row. When you click on it, an editing field with a maximum height of 10 lines height pop-ups; if your text exceeds this limit, a scroll bar is shown.
Text input can be limited by the data model. If the text input exceeds the limitation, a pop-up “It is not possible to save text with more than <X> characters” is shown. When you click outside the field, the text that exceeds the allowed range is cut.
- While you type in an Integer, Float, Duration, or Timecode field, your input is validated; if you provide an invalid value, a pop-up appears and shows the allowed input. If you click outside the field without having corrected the value, the auto-correction mechanism coverts your input to a valid value.
4. Click outside the row to end editing mode and save the new master data record.
5. To close the master data edit window, click the X button.
To edit a master data record:
1. Click in the master data field to open the master data edit window.
2. Hover the mouse pointer over a row and click the edit button that is shown at the right side of the row.
All fields of the row are set to edit mode. The cursor is positioned in the first non-boolean property.
3. Edit every field of the row as you would for a single-value property.
While in edit mode, you can press the Tab key continue to the next field within the row. Note that Boolean fields are skipped.
To remove the value of an individual field, click the X button that is shown at the right side when you hover thew mouse-pointer over of the field. Even if you remove all values from a master data record, the row will be kept.
4. Click outside the row to end editing mode and save the changed master data record.
5. To close the master data edit window, click the X button.
To delete a master data record:
1. Click in the master data field to open the master data edit window.
2. Do one of the following:

Hover the mouse pointer over the row and click the row’s Delete button.

Select a row and press the Del or Backspace key.

Right-click on a row and select Delete.
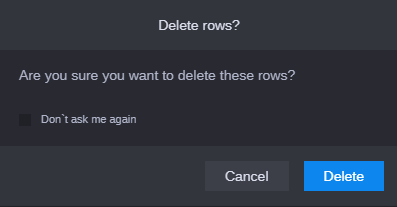
The Delete Rows security prompt opens.
If you select the Don’t ask me again check box, you disable the security prompt for your current session.
3. Click Delete to delete the selected master data record including all values.
If you click Cancel, press the Esc key or click outside the security prompt, the selected master data record is not deleted.
If the master data record is still used in a master data property of at least one asset, deletion is not possible.
4. To close the master data edit window, click the X button.


