Creating a Sequence
When you want to create a sequence, you can choose from one of three sequence types:
• Sequence: A flexible sequence type that allows you add multiple audio and video tracks and perform more complex editing.
• Shotlist: A sequence that includes a timeline with one video track and one audio track. This single audio track represents all source audio tracks. Typically you use it to create a simple sequence (sometimes referred to as a cut list or EDL).
• News sequence: A sequence that includes a timeline with one video track and three audio tracks. These tracks are labeled NAT, SOT, and VO for use in broadcast news workflows.
Part of the Asset Editor, the Sequence Timeline is located at the bottom of the screen. This area shows your loaded sequence and it is synchronized with the Media Viewer to enable editing.
For now, let’s create a shotlist and select clips through the Browse app. Then we’ll use the Asset Editor to build the shotlist. The examples in this section use clips to create a feature story about the London Zoo. Start by creating the sequence:
1. In the Browse app, navigate to the folder in which you want to store the sequence.
2. Right-click the folder (or within the folder) and select Create Shotlist.
Your sequence is created in the folder as “New.Shotlist.” Locate the sequence in the Browse app, and double-click it to load it. It’s empty, but it opens in the Media Viewer, with a start timecode displayed. There’s metadata in the Metadata tab, and two tracks in the Sequence Timeline: V (Video) and A (Audio). If you don’t see the Sequence Timeline at the bottom of your screen, click the Timeline button in the top-right corner of the Asset Editor to display it.
Click once on the name of the sequence in the Browse app (in this example, New.Shotlist) and give it a new name (for example, London Zoo Shotlist). Now you can start building your sequence.
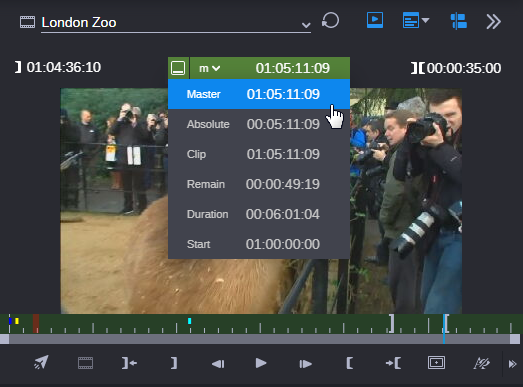
Browse to find a clip that you want, and double-click it to load it into the Media Viewer. You’re now in Source mode. You can easily verify which mode you are in from the color of the timecode display above the viewer. Blue is for sequences and green is for individual clips.
You can drag the blue position indicator to scrub through the clip, or use controls to play forward and back, until you have decided on your In and Out marks. In this example, In and Out marks are set for a duration of 35 seconds, as shown by the In to Out Duration in the upper right. Note how the timecode setting is set for Master (m), which represents the timecode for the position indicator. Click the turn down arrow to change the timecode setting.
To add the edited clip to your sequence, click the image in the monitor and drag it to the Sequence Timeline, so that the pointer is below the thin guideline and the outline of the clip is yellow (which indicates an insert edit). Then release the mouse button. Your new sequence now has its first clip.
Press Ctrl+S to save your sequence.
You might have noticed that if you rest your mouse pointer above the guideline, the outline of the clip is red. This indicates an overwrite edit. In the case of adding the first clip in a new sequence, it doesn’t matter if you add the clip as an insert or an overwrite. However, you should pay attention to this when adding additional clips as it will make a difference to how you build your sequence.


