Working with Card View Layout
In Card view, the thumbnail associated with each marker or restriction or thumbnails for each stratum segment are shown in addition to the text-based data that are provided in List view.
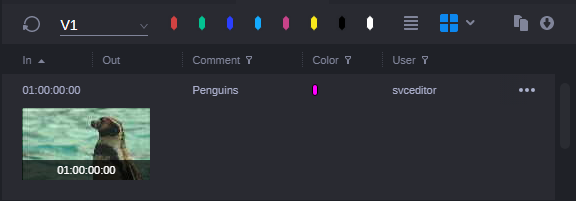
The following illustration shows the Card view layout for the V1 track of a master clip.
Note the following:
• Per segment, not more than two thumbnail rows are displayed by default. If there are more thumbnails available for the segment, a More button is shown at the bottom of the segment. If you increase the Asset Editor width so that all thumbnails can be displayed within two rows, the More button is hidden.
• For each segment, properties are displayed in one row. For each text property, the text length is limited to five rows. If the property text cannot be displayed, the text ends in an ellipsis. Click the three dots at the right side of the segment to open a pop-up window that displays all segment text properties.
• You can select a single thumbnail or a range of thumbnails in Card view, for example to add them to a sequence. You cannot select a non-consecutive series of thumbnails.
• The thumbnail selection is retained when you switch to another track or stratum and back or when you switch between Card and List View; it is not retained when you switching from a track or stratum to the Thumbnails layer.
• Edit options are limited in Card view.
To switch to Card view:
1. Select the track or stratum for which you want to display thumbnails from the layer selector.
2. 
Click the Card View button.
Production Management asset: For each marker the assigned thumbnail is shown. If the Restrictions layer is selected, at least the start and end frame of the restriction are shown. More thumbnails can be shown depending on the length of the restriction and the applied thumbnails filter.
Asset Management asset: For each segment at least the start and end frame of the segment are shown. More thumbnails can be shown depending on the length of the segment and the applied thumbnails filter.
To apply a thumbnail filter:
1. Click the turn-down arrow beneath the Card View button.
Since for markers only the frame to which the marker is assigned is displayed, changing the thumbnails filter does not affect the thumbnails display for the Production Management V and A tracks.
To show and hide more thumbnails for an individual segment:


Click the More button at the bottom of the segment.
Additional thumbnail row(s) are displayed.

Click the Less button at the bottom of the segment.
The additional rows are collapsed and only two thumbnail rows are shown for the segment.
To display a pop-up window with all text data:


Click the three dots (...) at the right side of the segment.
A pop-up windows opens and shows the properties and values of the segment, marker or restriction.
If the text of a property exceeds six rows, a scroll bar appears at the right side of the window. Click outside the window to close it.
To select and navigate in Card View:

Click a text element of a segment, restriction or marker.
The entire segment is selected. The first frame of the segment or restriction or the frame of the marker is shown in the Media Viewer.

Click a thumbnail of a segment, restriction or marker.
The thumbnail and the segment are selected. The corresponding frame is shown in the Media Viewer.

Click another thumbnail within the same segment.
Only the thumbnail is selected; the corresponding frame is not shown in the Media Viewer.

Double-click another thumbnail within the same segment.
The thumbnail is selected and the corresponding frame is shown in the Media Viewer.

To select several thumbnails, click a thumbnail, then press the Shift key and click another thumbnail.
The consecutive series of thumbnails is selected. The Media Viewer display is not updated.


 Click the Card View button.
 Click the More button at the bottom of the segment.
 Click the three dots (...) at the right side of the segment.
