Performing a Splice-In or Insert Edit
After you load a sequence into the Asset Editor, you can add clips to the timeline to start building your sequence. MediaCentral Cloud UX allows you to complete this task using multiple common editing methods such as insert (splice-in), overwrite, and replace. This section covers the concept of insert editing. For more information on overwrite, see
Performing an Overwrite Edit, and for more information on replace, see
Performing a Replace Edit.
When you add your first clip to the sequence, you can perform an insert or overwrite edit. As there are no other assets in the sequence, the method that you use for this first edit is somewhat unimportant. However, the way that you perform subsequent edits has a large impact on the look of your sequence.
An insert or splice-in edit allows you to add a clip before an asset, after an asset, or in the middle of an asset. When you complete the edit, the new asset is inserted after the Mark In point. Any assets following this point are pushed to the right. If you are working in a Sequence, only the assets on the enabled tracks are pushed out.
The following illustration shows a before and after example of a splice-in edit on a shotlist where the asset “Blue Castle” is added to the sequence. In this case, the blue position indicator defines the Mark In point. Notice that after the edit is complete, the remaining section of the original asset is pushed to the right — it is not overwritten.
In some cases, you might choose to perform the edit using the Splice-in button in the Sequence Timeline as illustrated above. In other cases, you might find it easier to drag and drop an asset to the Sequence Timeline from the Media Viewer, Browse app, or Search app. If you drag an asset from the Media Viewer (Source mode), the insert respects any Mark In or Out points that you might add to the source asset. If you drag a Production Management asset from the Browse or Search apps, the entire asset is added to the sequence. If you want to drag and drop an Asset Management asset, you must always first load it into the Asset Editor.
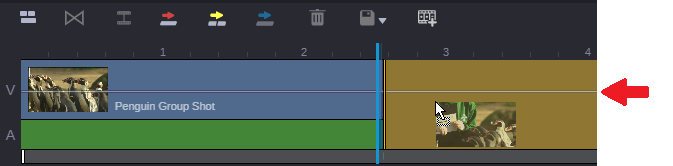
When performing a drag and drop edit to a shotlist or a news sequence, a thin guideline is displayed through the video track of the Sequence Timeline. If you drag the clip above the guideline, the tracks are highlighted dark red, indicating an overwrite edit. If you drag the clip below the guideline, the tracks are highlighted dark yellow, indicating an insert edit. If you keep the mouse button pressed, the Sequence Timeline displays where you can insert the asset. Release the mouse button to perform the insert edit, as shown in the following illustrations.
An insert edit in a shotlist. The arrow points to the edit guideline.
An insert edit in a news sequence.
If you load a Sequence and drag an asset to the Sequence Timeline, the insert edit guideline is not displayed. Instead, an outline of the asset appears that shows you the video and audio tracks that will be edited into the sequence. As shown in the following illustration, you can drag the asset above or below the audio / video tracks to alter the tracks that are used for the edit. Alternatively, you can drag the asset on top of the existing tracks.
If you want more precise control over the insert edit, you might consider using the Splice-in button instead of the drag and drop method. If you are editing a Sequence, you can also adjust the enabled tracks or track patching options for additional control. For more information, see
Using the Track Selector.

The Splice-in button in the Sequence Timeline is not available when working in news sequences.
For Production Management sequences, the aspect ratio and the frame rate is determined by the first clip that you add to the sequence. Any additional clips can have a different resolutions but must match the initial frame rate. See
Creating a Sequence.
For Asset Management shotlists, the target frame rate is defined when the shotlist is created. By default, you can add clips with a differing frame rate but mixed frame rate editing might be disabled by configuration in MediaCentral Asset Management.
To perform an insert edit on a shotlist or a Sequence using the Splice-in button or V key:
1. Create a new sequence or load an existing sequence into the record monitor of the Asset Editor.
2. Load an asset into the source monitor of the Asset Editor.
When performing an insert edit, you can load a single asset or another existing sequence to act as the source material for your edit.
3. Add Mark In and Mark Out points, or use the blue position bar to define the location and amount of material that you want to add to the sequence.
For more information on using Mark In and Out points while editing, see
Three Point Editing.
4. (optional, Sequences only) Adjust the enabled tracks or track patching options in the Track Selector on the far left side of the Sequence Timeline.
For more information, see
Using the Track Selector.
5. Click the Splice-in button in the Sequence Timeline toolbar or press the V key on the keyboard to make the edit.
To perform a drag and drop insert edit on a shotlist or a news sequence:
1. Do one of the following:

Double-click on an asset to load it into the Asset Editor and mark In and Out points.
The amount of material that you insert is determined by the In-to-Out duration of the asset.
When you use this method, the Asset Editor must be in Source mode.
In the Browse or Search app, click once on a Production Management asset in the results area to select it.
With this method, the entire asset is used (In and Out marks are set for the entire clip).
2. (Optional for news sequences) Click the audio track indicator or indicators for the tracks on which you want to insert the audio. You can enable NAT or SOT, both NAT and SOT, or VO. A VO edit does not include video.
If you do not enable an audio track, you can insert NAT or SOT audio by dragging the clip to either audio track.
3. Drag the asset to a location in the video track or an audio track. Make sure the mouse pointer is below the guideline.
The timeline shows where the insert will take place and how it will affect the other clips in the timeline. When using the drag and drop method, you cannot use the position indicator, In, or Out marks as an edit In point.
4. Release the mouse button.
The selected material is inserted into the timeline and the position indicator moves to the first frame of the next segment.
To perform a drag and drop insert edit on a Sequence:
1. Do one of the following:
Double-click on an asset to load it into the Asset Editor and mark In and Out points.
The amount of material that you insert is determined by the In-to-Out duration of the asset.
When you use this method, the Asset Editor must be in Source mode.
In the Browse or Search app, click once on a Production Management asset in the results area to select it.
With this method, the entire asset is used (In and Out marks are set for the entire clip).
2. (optional) Adjust the enabled tracks or track patching options in the Track Selector on the far left side of the Sequence Timeline.
For more information, see
Using the Track Selector.
3. Do one of the following to add the asset in the Media Viewer, Browse app, or Search app to the Sequence:
To add the asset to the Sequence with the default number of tracks (one video and two audio), click the image in the Media Viewer, Browse, or Search app, press the Shift key, and then drag the asset to the desired position in the Sequence.
To add the asset to the Sequence and have the edit respect snap points, click the image in the Media Viewer, Browse, or Search app, press Shift+Alt on your keyboard, and then drag the asset to the desired position in the Sequence. For more information on snap points, see
Snapping in the Timeline.
To add the asset to the Sequence and have the edit respect any adjustments to the Track Selector, click the image in the Media Viewer, press Shift+Crtl on your keyboard, and then drag the asset to the desired position in the Sequence.
The timeline shows where the insert will take place and how it will affect the other clips in the timeline. When using the drag and drop method, you cannot use the position indicator, In, or Out marks as an edit In point.
When you drag and drop an asset into a Sequence, MediaCentral Cloud UX performs an overwrite edit by default. When you hold the Shift key (or Shift+Ctrl keys) after clicking on the asset, you enable insert mode. Do not hold the shift key before clicking on the asset.
4. Release the mouse button.
The selected material is inserted into the timeline and the position indicator moves to the first frame of the next segment.