Working with the Planner Filters Tab
The sidebar includes lists of filters that you can use to narrow the number of assignments that are displayed in the Planner Explorer. When you apply a filter, the Explorer displays only those assignments that match your selected criteria.
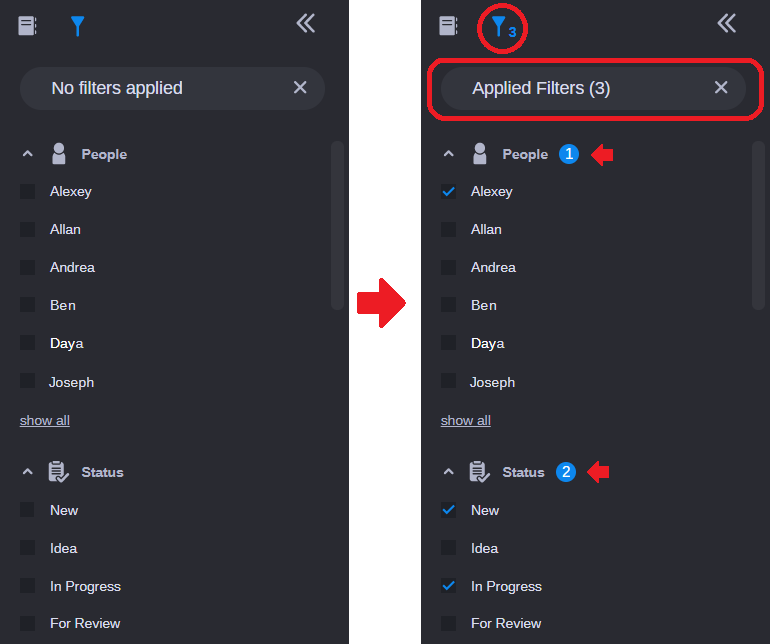
When you select a filter, the app updates the sidebar to help you identify the type and number of filters that are enabled. In the following illustration, the image on the left shows the sidebar with no filters enabled, and the image on the right shows the same list with three active filters.
The sidebar displays up to six selections for each filter category by default. In some cases the app might display a “show more” or “show all” button that allows you to select from additional filter options. If the category includes six or fewer additional selections, you can click the Show More button to expand the category directly within the sidebar. If the category is associated with more than six additional options, you can click the Show All button to open a break-out window that displays all possible filters for that category.
As long as you do not manually clear the filters or close the Collaborate app, they remain enabled for the duration of your user session.
To add a filter:

Click the box to the left of the filter to activate it.

After you select a filter, a blue check mark appears in the box and the app updates the contents of the Planner Explorer.
To remove applied filters:

Click the box to the left of an active filter to deselect it.


Click the X on the right of the Applied Filter’s header to remove all enabled filters.
The filter or filters are removed from the sidebar and the Explorer displays all possible results.

Click the Clear Filters button in the Collaborate Header.


 After you select a filter, a blue check mark appears in the box and the app updates the contents of the Planner Explorer.
  Click the X on the right of the Applied Filter’s header to remove all enabled filters.