Using the Track Selector
The Track Selector on the far left side of the Sequence Timeline allows you to enable and disable source and record tracks — which has a significant impact on the editing process. Additionally if you right-click on the Track Selector, you are presented with a context menu that provides you with actions such as track patching, deleting tracks, and more.
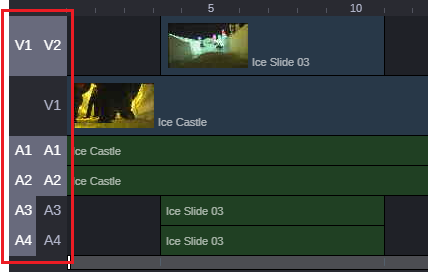
The following illustration shows an example Sequence with two video tracks and four audio tracks. The Track Selector is outlined in red.
Notice that there are two columns of track names. The column on the left represents the tracks associated with the asset that is loaded into the Source Monitor of the Asset Editor. The column on the right represents the available tracks in the Sequence. In this illustration, the user has added a second video track and has patched source V1 to record V2.
When working with multiple tracks, you might encounter a circumstance in which you must edit source audio or video onto a track other than the parallel track displayed in the Track Selector. To edit the source material onto another record track above or below it, you must patch the source track to the targeted record track. Audio can patch only to audio, and video only to video.
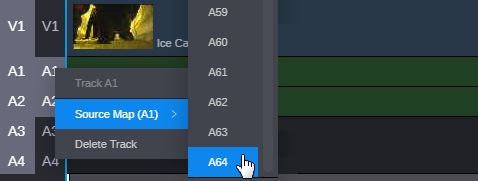
The following illustration shows a source asset with 64 audio tracks. In this example, the user is in the process of patching source track A64 to record track A1.
As you already know, the Asset Editor allows you to drag and drop assets directly to the Sequence Timeline. However in some cases you must use the patching options in combination with keyboard shortcuts or buttons in the user interface to complete your edit. For example if you have a source asset that includes V1, A1, and A2 and you want to edit that asset to the V2, A3, and A4 tracks, you cannot perform this type of edit using the drag and drop method.
Patching changes are tracked with each source asset. If you load a new asset into the Source monitor after making a change to the track patching, the tracks are reset to their default order. If you load the previous asset, the patching changes are recalled for that asset. These changes are tracked for the current user session only.
After you patch a track, a Reset option appears in the patching context menu under the final track. You can click the reset option to revert all track patching back to the default configuration.
To enable or disable tracks in the Track Selector:

Click on the track name in either the record or source columns to toggle the track on or off.
To patch tracks in the Track Selector:

Right-click on the track name in the record column and select a new source from the menu.
The source track is patched to the destination record track.
To reset all track patching back the defaults:

Right-click on the track name in the record column and select the Reset option at the bottom of the context menu.


