Creating and Editing Sessions

Sessions are a grid of components created from a template that includes data and information that is customized for a specific production. Each session is identified by a dedicated session icon in the Sessions view directory. From the Sessions view directory, you open a session, log it, and create spans for it. You can also edit the template associated with the session.
The basic steps in creating a session are:
• Create or select an event.
• Create a session for the event. You can create a session only within an event.
• (Option) Edit the associated session template.
- Renaming a component in the session template changes the corresponding column name in the Text Logging area.
- Moving a component in the session template changes the position of corresponding column in the Text Logging area.
- Deleting a component from a session template removes the corresponding column from the Text Logging area. You cannot delete components that already have been used to populate spans.
The following procedures provide more details for these steps.
To create a session:
1. Click the sidebar’s Sessions button.
You are now working in Sessions view mode.
2. Right-click an event in which you want to create a session and select Create Session.
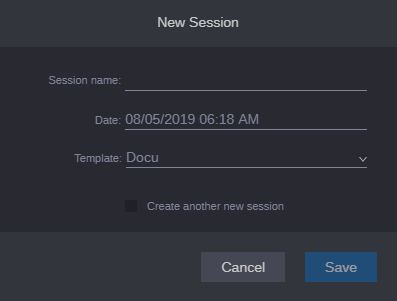
The New Session dialog box opens. The Date field shows the date and time when the dialog box was opened in the time zone and date format as set in your User Settings.
3. Type the name of the session in the Session name field.
4. (Optional) Click in the Date field and change the preset date for the session.
After you enter the first value, you are advanced to the next field automatically. If you want to manually navigate between fields, you can press the Tab key to advance to the next field, or you can use the arrow keys to move left and right between the fields.
The Up and Down arrow keys allow you to alter each field by one — for example, change the month from 9 to 10.
The Log app helps you limit the number of characters that you need to enter by analyzing your custom data. If you for example enter “3” in the month field, the value is changed automatically to “03” because the MediaCentral Cloud UX knows that there are no months that start with 3 as the first digit.
5. Select the template that is to be used for the session from the Template list.
The Template drop-down list shows you all templates that are created in the Templates view as a flat list.
6. (Optional) Select the Create another new session check box to keep the New Session dialog box open. This allows you to continue creating sessions.
7. Click Save.
The session is identified by a dedicated event icon and shown as contents of the event in the Sessions view directory. The session opens and shows the associated template in the Visual Logging area in preview mode. If you selected the Create another new session check box, the New Session dialog box stays open.
To rename a session, do one of the following:

In the Sessions directory:
a. Right-click a session and select Modify Session.
b. Change the name of the template in the Modify Session dialog box.
c. Click Save.

In the Visual Logging area:
a. Open the session.
b. Click the Edit button in the template header.
c. Change the name of the session in the Visual Logging area.
d. Click the green check mark in the header.
To edit a session:
1. Right-click a session and select Modify Session.
The Modify Session dialog box opens.
2. Change the name of the session in the Session name field.
3. Change the date assigned to the session in the Date field.
4. Click Save.
To edit a session template:
1. Double-click a session in the Sessions view directory.
The session opens and shows the associated template in the Visual Logging area in preview mode. The session name is shown on the Log app header. If the session has already been logged, the Text Logging area shows the spans created for the session.
2. 
Click the Edit button in the sessions header.
The template switches to edit mode in the Visual Logging area; the Text Logging area shows the toolbox.
3. Modify your template as needed. Since the session name is used as name of the session template, you change the session name when you change the name of the session template.
See the following topics:
4. 
To end session template editing mode, click the green check mark in the header.
The updated session template is available for logging the session. The Text Logging area again shows the spans created for the session.
To delete a session:
1. Right-click a session and select Delete.
A deletion confirmation prompt opens.
2. Click Delete.
The session is deleted and removed from the Sessions view directory.
 Sessions are a grid of components created from a template that includes data and information that is customized for a specific production. Each session is identified by a dedicated session icon in the Sessions view directory. From the Sessions view directory, you open a session, log it, and create spans for it. You can also edit the template associated with the session.
 Click the Edit button in the sessions header.
 To end session template editing mode, click the green check mark in the header.