Adding Content to the Publisher App
Media assets or existing video files can be added as “video sources” into your Publisher account in three ways:
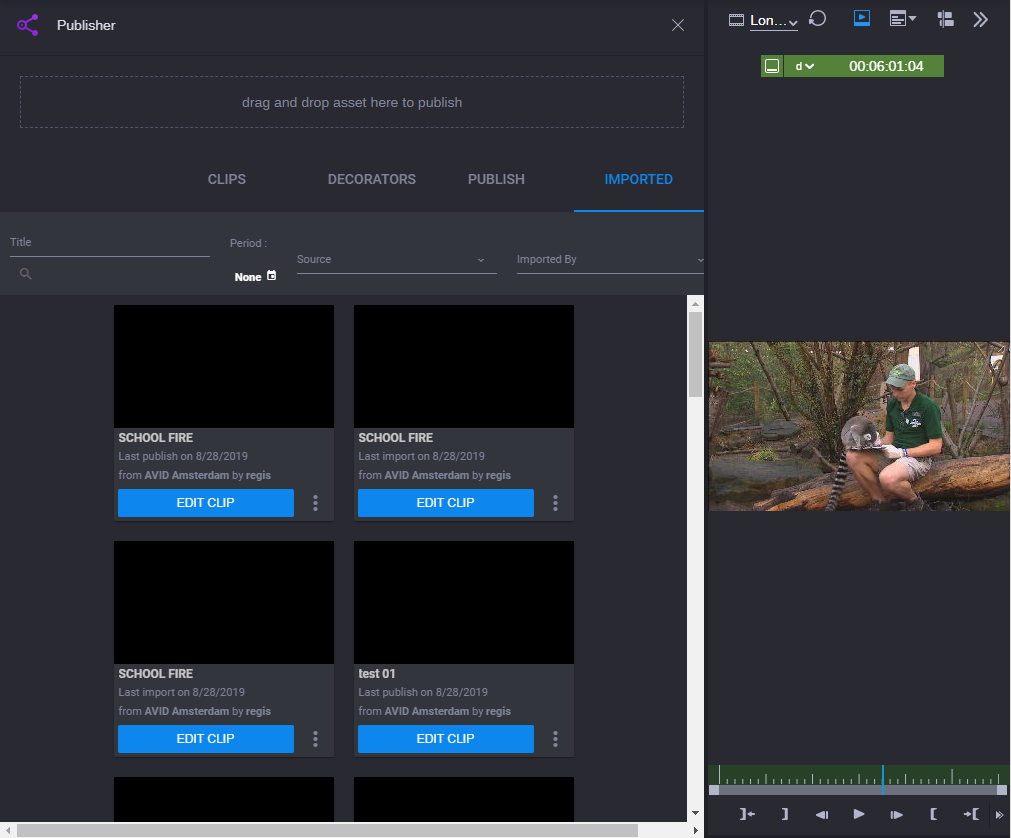
• Drag a video clip or image from the Browse app or video player directly to the drag and drop header.
• Select a file from the Browse External Content tab (if available).
• Add media / upload a file that is stored outside of the Production Management or Asset Management environment (e.g., Windows Explorer and other connectors when pressing on “Advanced upload”).
Once added, the content can be used in any of three ways:
• Stored as a video clip that can be edited or modified then shared to social media.
• Assigned as a “decorator” so it can be used as a Preroll/Postroll video.
• Used as a video source, enabling you to make smaller sub-clips that can be clipped out from the original source video.
To add content to the Publisher app:
1. From the Browse app, navigate to your source video in Cloud UX, and load a clip into the Video player.
After you select an asset, a representative video frame and related metadata appear above the video.
2. 
Click the Publisher app icon to open the Publisher app user interface.
After you click the Publisher app icon, you will see four or five tabs below the Publisher app header:
- Clips Management
- Decorators
- Publish Templates
- Imported Files
- Browse External Content - This is a connection to Production Management or Asset Management, allowing you to browse the Production Management or Asset Management system and quickly publish or save (upload to the SAAS server) a file.
It is important to note that there is a setting for an Administrator to restrict permission to access the Production Management, Asset Management, or both databases for any user profile. For more information, see the topic “Disabling Database Access for Specific User Profiles” in the MediaCentral | Cloud UX Installation Guide.
3. To add content into Publisher, do one of the following:
- Drag a video clip or image from the Browse app or video player directly to the Publisher app header area where it says “drag and drop assets here to publish”.
After you drag an asset into the Publisher app header, the text turns blue and says “Drop asset here to publish”.
Release the mouse button. A representative video frame appears in the Publisher video player, and in the Clip Details area as shown below:
- Select a file from the Browse External Content tab. This is a connection to the Production Management or Asset Management system, allowing you to browse the Production Management or Asset Management system and quickly publish or save (upload to the SAAS server) a file.
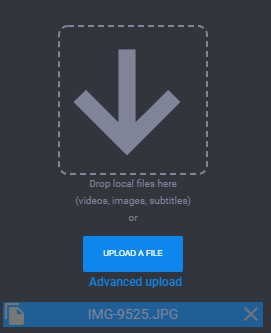
- For media that is outside of the Production Management or Asset Management environment (e.g., Windows Explorer, etc.), click the Imported files tab, and drag and drop files (videos, images, subtitles) from your local system to the down arrow where it says “Drop local files here”.

The arrow will turn blue when the file is held over it.
When you release the mouse button, the file will appear below.

You can drag multiple files to this area, and then import or publish them at once.

When importing a video this way, if there is an SRT file next to the video (and it has the same name), you can import both the video and the SRT file by selecting and uploading both the video and the SRT file.
4. At this point, you are ready to either publish video clips and media assets, or make enhancements before you publish.
For more information, see the following topics:
 Click the Publisher app icon to open the Publisher app user interface.
  Click the Publisher app icon to open the Publisher app user interface.
  Click the Publisher app icon to open the Publisher app user interface.


