Creating Tasks
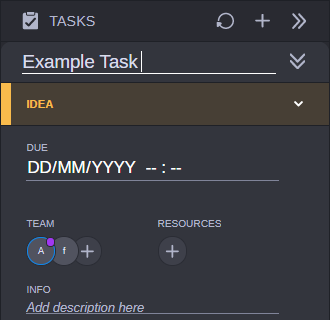
Complete the following process to create a new task. After creating a task, you can double-click on the item to edit the title, status, or other values.
To create and configure a task:
1. Click the Add Task button in the upper-right corner of the Tasks panel.
The app displays a new task with the default name of New Task.
2. Click the title area and enter a new name for the task.
3. (optional) Click the Status menu below the task title and assign a new status.
Each new task is associated with the New status by default.
4. (optional) Enter a Due date and time to define the completion date for the task.

After you assign a Due date, you can click the Download button to save the task as a calendar entry. For more information, see
Exporting the Assignment to a Calendar.
5. (optional) Click the Team button and assign one or more users to the task. When you click the button, one of two menu types appear:

If the assignment or the associated topic includes one or more team members, the task displays a fast menu that includes these team members. If you want to add a user that is not already associated with the topic or assignment, click the “Show all” link to display a list of all team members.

If the associated topic does not include any team members, the task displays a list of all team members.
The task is updated with the selected team members. Due to the size of the Tasks area, a maximum of three avatars are displayed at one time. You can click the + button to review the full list of users that are associated with the task.
If the user has the Collaborate app installed on their mobile device, they will receive a notification that they have been added to the task.
6. (optional) Click the Resources button and assign resources to the task. Similar to the Team button, the Resources button might display either the fast menu, or a complete Resources menu.
The task is updated with the selected resources. Due to the size of the Tasks area, a maximum of three avatars are displayed. You can click the + button to review the full list of resources that are associated with the task.
7. (optional) Enter text in the Info field to provide a more detailed description of the task.
Similar to topics and assignments, Collaborate allows you to add not only text, but also (web) links into the Info field.
8. Do one of the following:

Click the Create button at the bottom of the Tasks panel to save your task.

Click Cancel to exit the task without saving


Click the chevron to the right of the task name to exit edit mode. In this case the system prompts you to save or cancel through the Close Task window.


 After you assign a Due date, you can click the Download button to save the task as a calendar entry. For more information, see Exporting the Assignment to a Calendar.
 Click the chevron to the right of the task name to exit edit mode. In this case the system prompts you to save or cancel through the Close Task window.