Working with Assignments
After you create a topic, you can begin to create assignments that detail the work that must be completed to accomplish the topic’s goal. Topics and assignments share a 1:1 relationship in that you can link an assignment to only a single topic at any one time. However after you create the assignment, the Collaborate app allows you to move that assignment to a different topic as needed.

In this release, Avid supports a maximum of 100 assignments per topic. Although this limit is not strictly enforced, organizations could see a performance impact if users exceed this maximum assignment count.
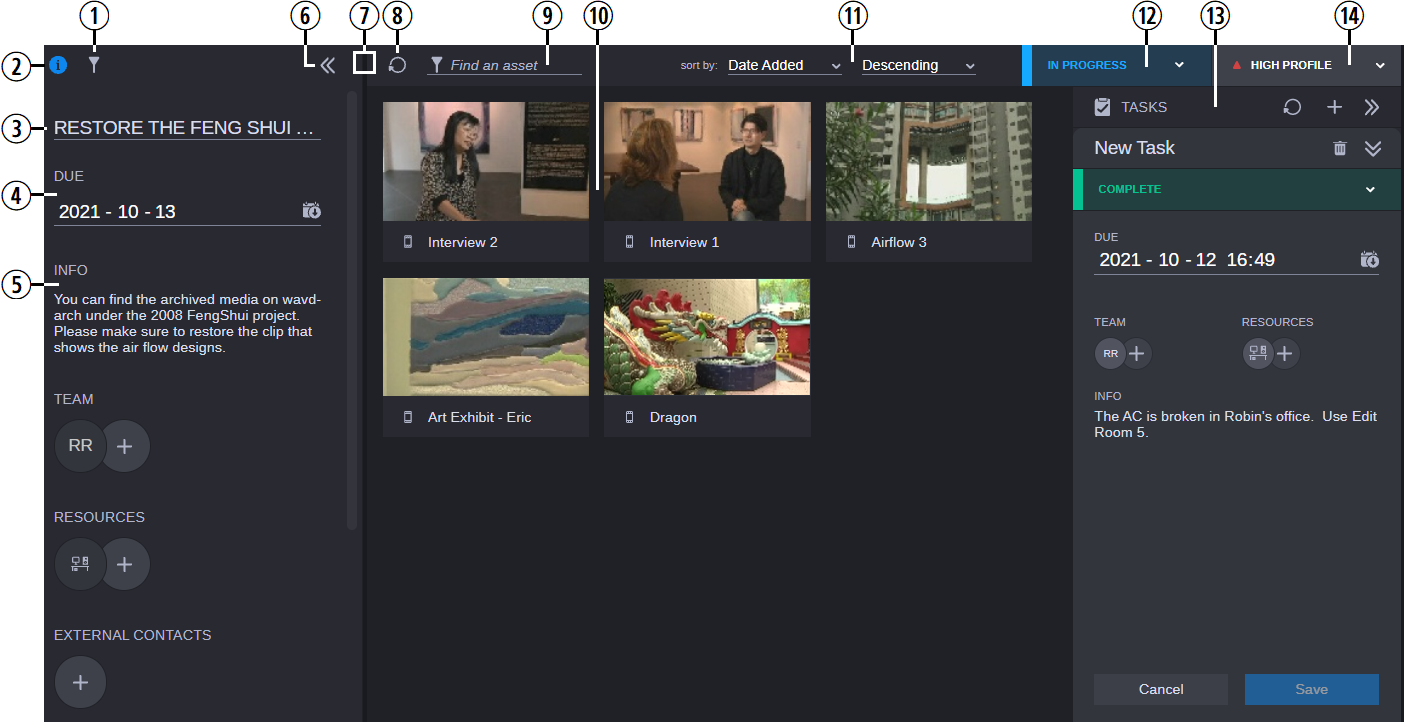
The following illustration and table describe the different areas of an assignment.
| Button or Function | Description |
1 | Filter Button | Similar to the Filter button that is available in the Project Planner, this button displays a list of filters that you can use to narrow the contents of the Media Container. |
2 | Info Button | Allows you to open or close the Assignment’s Info panel. When you first open an assignment, the Info area is hidden by default. You can click the Info button to display or hide the Assignment Info panel. As long as you do not close the Collaborate app, this setting persists throughout your MediaCentral Cloud UX session |
3 | Assignment Name | Displays the name of the current assignment. You can click this field to change the name of the assignment. |
4 | Due Date | Allows you to assign or change the assignment’s due date. You can also export the assignment details to a calendar application. For more information, see Exporting the Assignment to a Calendar. |
5 | Assignment Info and Metadata | Similar to topics, assignments allow you to configure contacts, resources, metadata, and other values — many of which can be inherited from the original topic when you create the assignment. For more information, see Editing an Assignment. |
6 | Collapse | When the Info panel is open, you can click the Collapse button to hide the panel. |
7 | Panel Divider | You can resize the amount of space allocated to the Info panel by dragging the divider to the left or right. If you adjust the size of the panel, this change remains consistent across different MediaCentral Cloud UX sessions. The size of the panel is saved in your local browser cache, so the change remains consistent across different MediaCentral Cloud UX sessions (on a per user / per workstation basis). |
8 | Refresh | If another user is actively updating the same assignment, you can click this button to update the display and view the changes. Alternatively, the app updates automatically when you switch from one area to another — such as switching between an assignment and its linked topic. This refresh button does not update the status of the Tasks area of the app. |
9 | Find an Asset | This field allows you to search for the names of any audio/video media asset that you have added to media container. If your topic or assignment includes a note, the search also looks for a match in the note text. |
10 | Media Container | Allows you to add assets that are related to this assignment. For more information, see Working Within the Media Container. |
11 | Sort Controls | Similar to other areas of MediaCentral Cloud UX, the Assignment Container allows you to organize your assets by familiar categories such as Date Added, Name, and others. You can further refine your display by selecting an option from the Ascending / Descending menu. |
12 | Status Menu | |
13 | Tasks area | Allows you to create tasks that are related to this assignment. For more information, see Creating Tasks. |
14 | Priority Menu | |
Additional Information on Assignments
This section includes the following processes:
