Working with Templates
Templates provide the layout and controls for sessions. They can be already associated to data sources. You start by creating an empty template, then populate it with various components in the Visual Logging Area. Each component has its specific purpose and defines specific entry values. Note the following terminology:
• Master template: A template created in the Templates view, used as an entry point for the creation of a session template. Master templates are shown in the Templates directory of the Templates view.
• Session template: A (copy of a master) template associated to a session. Session templates are only visible to users through a session interaction; they are not displayed in any folder or the Templates directory. Loggers have the ability to quickly modify the session template structure by adding, removing or modifying components, and changing the data source assignments or simply correcting entries. Modification of a session template is not moved back to the master template; modification of the master template does not update the session template.
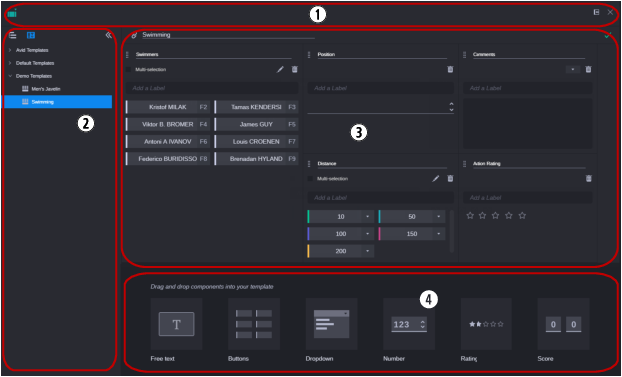
You can access the Templates view by clicking on the Templates button of the Log app’s sidebar. In the Templates view, the Log app has four main sections, as shown in the following illustration.
| Section | Description |
1 | Log App Header | In Templates view mode, the Log app header only includes the Dock and Close buttons. |
2 | Sidebar in Templates View | Allows you to display and maintain a folder structure in which you create and organize your templates. Templates are identified by a dedicated icon in the folder structure. To access the Templates view, click the sidebar’s Templates button so that it turns blue. In Templates view, you can do the following: • You can create top-level folders and sub-folders. • You can create templates within a folder. • You can delete only empty folders; you cannot delete folders that contain sub-folders or templates. You can show and hide the sidebar. See Collapsing the Sidebar. |
3 | Visual Logging Area | Includes the components you added from the Toolbox. In preview mode, the components are shown read-only. After switching to edit mode, you can edit the component settings. |
4 | Toolbox | Is shown after you switched the template from preview to edit mode. Displays the components that you can add to your template in the Visual Logging area. Currently these are: • Free text: Used to enter text. • Buttons: Used to create a set of buttons, of which one or more than one can be selected at the same time. • Dropdown: Used to create a drop-down list from which one or more than one item can be selected. • Number: Used to enter a number, for example, the distance from the goal. • Rating: Used to assign one through five stars. • Score: Used to enter the score of a game. |
You generally open a template in the Template view first in preview mode.
• In preview mode, the Visual Logging area expands the entire space and shows all components added to the template in read-only mode.
• After switching to edit mode, the toolbox is shown and you can add components to and edit components on the template.

