Welcome to the Avid MediaCentral | Cloud UX Help > Working with the Process App > The Process App

The Process App
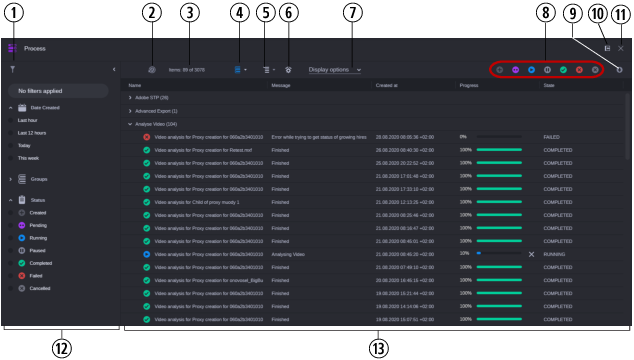
In the Process app, you can monitor the processes of the selected type, apply filters to the processes displayed in the Process List, and modify the Process List layout. The following illustration shows an example of what you might encounter when monitoring processes in the Process app if the option to display processes in groups is active.
 
 
Display or Control
Description
1
Filter button
Opens the Filter sidebar that lets you apply predefined filters to the processes displayed in the Process List. When you apply a filter from the Filter sidebar or a status filter from the toolbar, the button turns blue. See Showing and Hiding the Filter Sidebar and Applying Filters from the Filter Sidebar.
2
Refresh button
Use the Refresh button to reload processes in the Process List manually. You can enable an Auto-Refresh option that automatically updates your processes list upon process changes. When in auto-refresh mode, you can still click on the Refresh button to manually update the processes list Process List. See Refreshing the Process List.
3
Process counter
Displays information about the number of processes shown in the Process app: Number of displayed processes in the form “Items: <n> of <m>” (for example: Items: 100 of 580). <n> is the number of processes displayed in the Process List, <m> is the number of all processes that match the applied filters.
The numbers are influenced by applied filters and Grouping and Hierarchy toggles.
Items 0 of <m> is shown when you enable grouping since the collapsed process groups are shown in the Process List.
4
Display Group button
Toggles displaying processes in groups on and off:
If toggled on, processes are displayed in the Process List grouped by the process group property (or by the process class property, if process group is not set).
If toggled off, processes are displayed in a flat list.
When displaying processes in groups is toggled on, you can show and hide the contents of the process groups. See Working with Process Groups.
5
Show Hierarchy button
Toggles displaying the process hierarchy (parent processes with their child processes) on and off:
If toggled on, child processes are displayed below their parent process in the Process List. The child processes can be shown or hidden.
If toggled off, all processes are displayed in a flat list.
When displaying processes in hierarchy is toggled on, you can show and hide the child processes. See Working with the Process Hierarchy.
6
Top-level Filter button
Toggles displaying top-level processes on and off:
If toggled on, only top-level processes are displayed in the Process List.
If toggled off, processes of all hierarchy levels are shown in the Process List.
Currently the Top-level Filter is only supported for Asset Management processes.
7
Display Options
Lets you define which columns are displayed in the Process app. See Showing and Hiding Columns.
8
Status icons
Shows an icon for each process state. Lets you apply a filter to the processes that are already shown in the Process List. See Applying Filters from the Toolbar.
9
Download button
Downloads the list of processes that match the current filter criteria in a *.csv file. See Downloading the Processes List.
10
Docking button
Docks the Process app at the left side of the MediaCentral Cloud UX window.
11
Close button
Closes the Process app.
12
Filter sidebar
The controls of the Filter sidebar apply filters to the processes that are already shown in the Process List. See Applying Filters from the Filter Sidebar.
 
Creation Time filter
Filters the processes shown in the Process List by creation time. The Creation Time list offers relative time ranges.
 
Groups filter
Filters the processes shown in the Process List by the process group property.
 
Status filter
Filters the processes shown in the Process List by the following states:
Created
Pending
Running
Paused
Completed
Failed
Cancelled
13
Process List
Displays processes, depending on the filter applied to the app. The Process List can show the following columns:
Name: Displays the name or the ID of the process. In front of the process name an icon indicates the life-cycle status of the process.
The icons change as soon as the life-cycle status of the process is changed.
Message: Displays a message depending on the provider of the process; for example, a message if an error occurs during the process life-cycle or information about the current process status of an Asset Management process. Might be empty.
Up to 100 characters are shown in the Message field. If the message text exceeds this threshold, a tool-tip then shows up to 500 characters of the message.
Created at: Displays the date and time when the process was created.
Progress: Displays the progress of the process life-cycle as a colored bar and percentage value.
- Uncolored bar and percentage value 0 for Pending processes.
- Blue bar and percentage value 0 through 99 for Running processes.
- Green bar and percentage value 100 for Finished processes.
- Red bar and value 0 through 100 for Failed processes.
To the right of the progress bar, the following buttons to apply actions to a process might be shown:
- Cancel: Cancels the process underway. The Cancel button is shown for active processes that allow cancellation.
- Retry: Resends a failed or canceled process (Production Management processes only).
State: Displays the status of the process: Created, Canceling, Running, Completed, Canceled, or Failed.
Ranking: Currently always 100 for Production Management processes and 1500 for Asset Management processes.
Priority: The priority of the process. Might be empty. For Asset Management processes, MEDIUM or HIGH is currently shown.
You can configure which columns are displayed by using the Display Options menu. See Showing and Hiding Columns.
To open the Process app:
*Click the Process button on the Fast Bar.
*Place your cursor over the Process app button in the Fast Bar and drag and drop it to the main area of the user interface.
*Place your cursor over the Process app button in the Fast Bar and drag and drop it to the left side of the user interface.
The app opens. If dropped to the left side of the user interface, the Process app is docked.
To dock and undock the Process app:
*To dock the app, click the app’s Dock button.
*To restore the app to take up the full screen, click the Dock button again.
To hide the Process app:
*(If the Process app is not docked) Click the button of another core app on the Fast Bar (such as the Browse or Search app).
*(If the Process app is docked) Dock another core app.
To close the Process app:
*Click the X in the app’s upper right corner.